Project 1A: The Baseboards
My Mission:
To add some character to our baseboards by making our plain old standard 3” baseboards look taller without going to the expense of replacing them with new 5” baseboards. I was hoping to achieve a more formal look, especially in the living room and dining room.
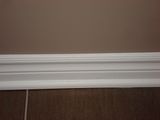
Before: the old baseboards (minus the pretty painted wall of course).

Most people would probably think there was nothing wrong with these baseboards. I on the other hand I LOVE the look of a taller moulding. In fact I love all moulding – wainscoting, crown moulding, coffered ceilings. I reminds me of an older home, where character is defined by the eloquent wood trims they used on the walls and ceilings. In modern times it is painted out white for a more light and airy feel – even that doesn’t take away from the elegance it creates in a room. Go ahead, Google “luxury homes” and you’ll see for yourself exactly what I am talking about!
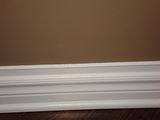
After: the new baseboards

DIY Coles Notes Version
It was a really simple fix. I went to Home Depot and found a skinny little trim attached it to the wall about 1 ¼” above the baseboard and painted the whole thing white so it reads as one piece.
DIY Tips for the Project
- Cutting the moulding with a mitre box and hand saw worked the best. The electric saw seemed to burn the wood and chew the ends.
- Drill pilot holes for the finishing nails keeps the moulding from splitting
- Use a small bead of glue to help the trim stick and stay put on the wall then hammer in the nails to keep it in place. (this is a 2 person job)
- Use a piece of wood or other straight object as a spacer to measure the height from the top of the baseboard to the bottom of the new trim. We used a piece of a picture frame that got broken in the move. You and your partner in crime should each have an identical piece.
o Here’s how we did it:
~ After we put glue on the back of your moulding, we slid the spacer against the old baseboard ensuring its flush against the top of the baseboard.
~ We put the new moulding against wall and slid it into place flush against the top of the spacer.
~ We hammered in a couple of nails that are in the near by vicinity of the spacer.
~ We slid the spacer down the trim to the next set of nails, repeat until all nails are complete. (We hammered the nails in half way so they were through the trim and into the wall board and then went back and counter sunk them. We didn’t need 3 hands this way!)
~ We made sure to keep a damp cloth near by to wipe off any excess glue off the wall.
- caulk the top and corners of the trim for a more professional look
o Here’s how we did it:
~ We put a bead of caulking along the top edge of the new moulding
~ I ran a finger along the edge to smooth it out. A damp finger works best
~ I used a damp cloth to wipe off any excess caulking from my finger every couple of feet so I didn’t smear caulking all over the walls.
- tape off your floor and paint all trim one colour
The Cost for the project
Trim: $4.87 per 8 foot length. I used about 10 pieces Total: $48.70
Mitre Box and Saw $12.95
Caulking $ 4.95
No More Nails Wood Glue $ 8.95
Caulking Gun $10.95
Finishing Nails $ 7.95
Grand Total $94.70
(plus taxes and stuff of course)
Conclusion
For less than $100 I achieved the look of taller trim. If we had replaced the trim, it would have cost double.
Would I do it again or hire a professional? I would probably just do it myself. It achieved the look I was going for and wasn’t too time consuming. Anyone who is handy can complete this project quite easily.
No comments:
Post a Comment